
3 Ways to Change Image DPI, and Why All Designers Need to Know How
There are so many graphic design projects I’ve seen go horribly haywire because small errors were made at the start and they compounded as the project progressed. If you’re a graphic designer, you need to know the differences between print and digital, what makes good typography, the difference between raster and vector images, different color-mixing methods, and so much more, it can be overwhelming. But you have to start somewhere.
I’m going to teach you about what an image’s dots-per-inch (DPI) is for, because I want to save you from suffering the way I have.
Why Every Designer Needs to Know DPI
What kind of pain and suffering can I save you?
I once spent three hours redoing work on a 8-foot by 3-foot photo-collage banner because the person who started the file didn’t know how DPI and resolution worked. The photos in the collage weren’t saved at a high enough resolution to print at larger than a few inches each, and there weren’t nearly enough of them to span eight feet across.
It doesn’t even have to be someone else’s mistake. I’ve done this to myself: starting projects at a low resolution and then realizing later that it can’t be printed at the size I needed.
What is DPI?
Let’s take some time to clear up some terms. DPI stands for Dots Per Inch, and it’s a specification for a printer, meaning how many physical dots of ink will it print in a full square inch. Your home inkjet or laser printer will do alright at 200 dots per inch, but a professional printers typically won’t print at less than 300dpi or higher. That’s so that when you look at the final print-out, the image comes out crisp. If you use fewer dots, the image will come out blurry or seem pixelated.
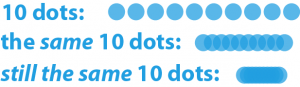
For smooth detail, you want lots of small dots, tightly packed together, so the viewer can’t tell where where one dot ends and the next begins.
Here’s a visual demonstration of what I mean.
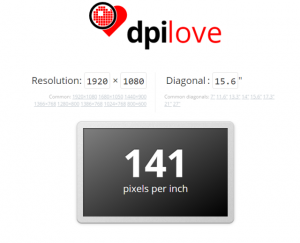
PPI stands for Pixels Per Inch, which refers to how many squares of colored light a screen fits in one square inch. Standard displays have 72 pixels per inch. Some monitors have 90ppi, and those in Apple’s “Retina” category can have hundreds of pixels per inch. If you’re curious, you can easily find out the PPI of your screen at DPI Love.
For smooth detail, you want lots of small dots, tightly packed together, so the viewer can’t tell where where one dot ends and the next begins.
Here’s a visual demonstration of what I mean.
Checking an Image’s DPI
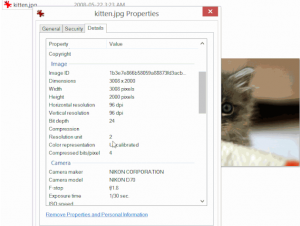
To find out an image’s DPI, right-click on the file name > Properties > Details. You’ll see the DPI in the Image section, labelled Horizontal Resolution and Vertical Resolution.
Change DPI in Photoshop
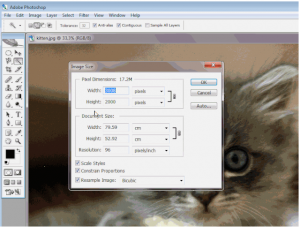
To change an image’s DPI in Photoshop, go to Image > Image Size. Now this is very important: Uncheck “Resample Image” at the bottom of the window. If you don’t, Photoshop will simply upsample the image, meaning it’s adding pixels without adding detail.
How to Change an Image’s DPI
You can change an image’s DPI with most image-editing programs, but the feature doesn’t come in-the-box with Microsoft Paint. If you have Adobe Photoshop or GIMP (one of our favorite open-source cross-platform image editors you can download for free, even as a portable app), you’re all set.
We’ll show you how to change the DPI in both programs, as well as for free online (which is handy if you’re editing images on a Chromebook, for example).
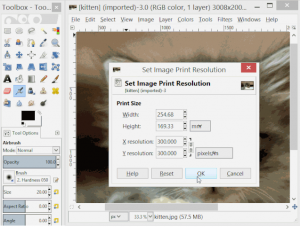
Change DPI in GIMP
If you’re editing your image in GIMP, you can change the DPI by going opening the Image menu > Print Size. Then, enter the resolution you require for the x-axis and y-axis, and click OK. Unlike in Photoshop, you won’t need to worry about upsampling.
You’ll notice the print size will change, because changing how many dots per inch you want printed will mean you’re fitting more pixels into the same amount of space, shrinking the result.
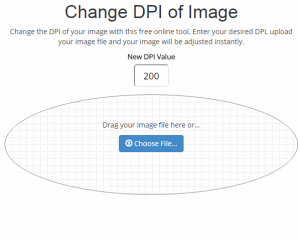
Change DPI Free Online
If you’re in a pinch and you don’t have your graphics program of choice on hand, you can always change the DPI of an image with Convert Town’s DPI-changing web-app, for free online.
All you have to do is input the DPI you need the image changed to, drag-and-drop the file to upload it, and wait. When it’s done converting, it should automatically download it to your default download folder.
Learning More
There you have it: three of the best free and easy ways to change a graphic’s DPI. It’s not hard to do but trust me: it will save you headache if you get it right before you start your next print design.
Every graphic designer needs to know this whether you specialize in graphics for print or for digital. If you ever need a printed poster for advertising, you don’t want to be caught out by being the only graphic designer on your team but not knowing this basic concept. If you didn’t know about it before, don’t dismay – many basic principles of graphic design can be learned.
What Concepts Do You Struggle With?
Are there any other graphics concepts you want explained? We’ve got articles on becoming a graphic designer – and we can teach you how to profit at graphic design online, too. If you don’t find what you’re looking for, comment below to let us know what you want to learn next!
Finally, if you have any horror stories of a graphic design project gone wrong and want to share what you learned, we’d love to hear them so we can all save each other grief down the road.